 EN
EN
 AR
AR
 BG
BG
 CS
CS
 DA
DA
 NL
NL
 FI
FI
 FR
FR
 DE
DE
 EL
EL
 HI
HI
 IT
IT
 JA
JA
 KO
KO
 NO
NO
 PL
PL
 PT
PT
 RU
RU
 ES
ES
 SV
SV
 TL
TL
 ID
ID
 UK
UK
 VI
VI
 HU
HU
 TH
TH
 TR
TR
 FA
FA
 AF
AF
 MS
MS
 SW
SW
 GA
GA
 CY
CY
 BE
BE
 KA
KA
 LA
LA
 MY
MY
 TG
TG
 UZ
UZ

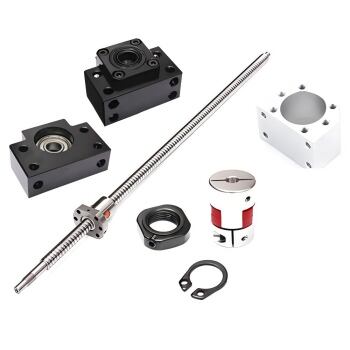
Ball screws are critical components in machine tools, automation equipment, and precision machinery. They directly impact transmission accuracy and operational stability. After long-term use, the screw may wear or experience excessive play. Therefore, it is crucial to learn how to properly replace a ball screw.

First, prepare the machine.
Shut down the machine and disconnect the power supply to ensure a safe operating environment. Then, clean the installation area to prevent dust from entering the transmission system. Gather the necessary tools, such as a torque wrench, calipers, grease, a new ball screw, and an auxiliary installation tube.
Next, begin disassembling the old screw.
First, loosen the coupling and retaining bracket, then carefully remove the nut and support cap. Maintain stability during this operation to prevent the balls from falling out. Also inspect the bearings and guide rails; if worn, replace them.
Next, install the new screw.
First, place the screw into the support bracket to ensure proper alignment. Use the auxiliary tube to smoothly push the nut into the screw to prevent the balls from falling out. Then, connect the lead screw to the motor or drive end and tighten the screws to the specified torque. At this point, adjust the preload to ensure transmission accuracy and smoothness.
Finally, perform commissioning and inspection.
Manually rotate the lead screw to confirm smooth operation without binding. Apply appropriate grease to ensure good lubrication. After powering on, perform a low-speed test run to observe for any abnormal sounds or vibrations. If all is normal, the equipment can be resumed.
In short, replacing a ball screw requires standardized procedures and meticulous operation. Proper installation not only extends the life of the equipment but also maintains high-precision operation. During maintenance, companies should regularly check the condition of the lead screw and replace it when necessary to ensure production efficiency and product quality.